Crafts with Pizzazz: Ant-Man!

Blog Pic 37

Hello from Bee!

Have you noticed how the warm weather tends to bring out the ants? And of course, Marvel fans know that where there are ants, there is also Ant-Man!

I really loved “Ant-Man” last summer. It was definitely one of the funniest Marvel films, especially with Paul Rudd and Michael Peña, and it was great to see Michael Douglas as Dr. Hank Pym. Of course, I was incredibly excited to see Paul Rudd back as Scott Lang in “Captain America 3: Civil War” a few months ago, and of course, I had to add him to my Avengers team.

While Ant-Man did not prove incredibly challenging to make – my usual “people pattern” accented with red felt and gray yarn decorations – the best part about it was that it gave me an opportunity to reuse my Batman cowl pattern. As I wanted to make an open version of the Ant-Man helmet to showcase his face, I eliminated the eye and chin straps from my cowl pattern and simply crocheted the piece that covers the head. I also crocheted two thin in-the-round cylinders and sewed them on for antennae.

Welcome to the team, Scott! 🙂

Crafts with Pizzazz: Spiderman!

Blog Pic 36

Hello from Bee!

Speaking of Bumblebee and bugs in general, I’d like to switch gears this week from DC back to Marvel and show you the latest addition to my team of Avengers: the wall-crawling, web-slinging, amazing Spiderman!

Spiderman is unquestionably one of Boss-Bot and my favorite superheroes, and I’ve wanted to crochet him for a while. His costume, however, did present a bit of a challenge in the form of vertical stripes. When crocheting in-the-round, there are “jogs” that occur between rounds, mostly visible where there are color changes. This makes it difficult to create smooth horizontal stripes, as well as vertical stripes that don’t end up shifting over a few stitches each round.

There are many different ways to work with these jogs; I’ve seen blog posts and YouTube videos demonstrating techniques involving slip stiches and BLO (back loop only) crocheting at color changes to make them smoother. However, these techniques were geared specifically towards horizontal stripes, so when it came time to crochet Spiderman’s arms, I had to figure out my own.

When I tried to create vertical stripes before, I noticed that the color shift occurred in steps, moving over a stitch each round. I decided to try compensating for this shift by changing colors one stitch earlier each successive round; this way, I ended up with a smooth vertical stripe and only two thin, running stitch-looking lines of blue and red in the red and blue color blocks, respectively – but those are easily fixable by weaving the proper-colored yarn tail over them a couple of times.

Aside from the vertical stripes, I worked out a pattern for a separate red chest piece that I sewed over the body for a more three-dimensional appearance. The eyes were made out of felt and outlined in black fabric paint; the latter of which I also used for the Spiderman logo.

Looking good, Spidey! 🙂

Crafts with Pizzazz: Wonder Woman!

Blog Pic 34

Hello from Bee!

In my last post, I briefly mentioned the old 1970s television show, “Super Friends.”  Although different than the Justice League, the Super Friends feature several of the same main characters: namely, Batman, Robin, Superman, Wonder Woman, and Aquaman. As I have already shown you the first three, today’s post is all about Wonder Woman!

Wonder Woman is definitely a favorite here at Nerds with Pizzazz. When Boss-Bot and I saw “Batman vs. Superman: Dawn of Justice,” we both agreed that she, as played by Gal Gadot, is one of the big highlights of the movie. As such, I was really looking forward to adding Wonder Woman to my crocheted Super Friends collection.

To make Wonder Woman, I had to figure out one new proportion for her costume, changing colors at the bottom and then again at the top to create her classic sleeveless look. I also ended up using felt and some fabric paint for the details on her top, boots, and headband. In addition, due to the smaller size of my crocheted figures, I discovered that making the tiny stars that adorn the bottom of her costume would be impractical; instead, I rolled small pieces of white felt into dots and glued them in place.

Call in the Invisible Jet! Wonder Woman is here! 🙂

Blog Pic 35

Crafts with Pizzazz: Superman!

Blog Pic 32

Hello from Bee!

Happy spring, everyone! The sun is shining, the flowers are blooming…it’s the perfect weather for taking a walk or flying a kite – or perhaps, according to my next crochet figure, just flying! That’s right: here to follow up my Batman post is his “Dawn of Justice” co-star, the Man of Steel himself, Superman!

Admittedly, I haven’t followed Superman as much as Batman (unless, of course, you count the “Super Friends” reruns that were on years ago – a fun old series that, I will say, is worth a re-watch!). However, Boss-Bot and I very much enjoyed him in both “Man of Steel” and “Dawn of Justice”; Henry Cavill does a great job with the character.

As far as crating goes, crocheting Superman was far less complicated than when I made his fellow Justice Leaguer. I simply followed my standard “people pattern,” adding a cape, embroidered belt, and felt S-shaped logo.

Super Friends unite! 🙂

Blog Pic 33

Crafts with Pizzazz: Batman and Robin!

Blog Pic 31

Hello from Bee!

Wow! I’m so glad you all liked my C-3PO! He was a lot of fun to make – and so were the two I’ll be showing you this week!

A couple of weeks ago, Boss-Bot and I went to see “Batman vs. Superman: Dawn of Justice.” Despite what the critics are saying, we thought it was a very well-done movie and liked it a lot. I’ll leave the formal reviewing to Boss-Bot, but in any case, it made me want to revisit some older versions of the title characters, including my absolute favorite, the 1966 “Batman” television show with Adam West and Burt Ward. If you’ve never had an opportunity to see it, picture brightly-colored sets and costumes, dialogue filled with quips and puns, and action sequences where words such as “BIFF!”, “BAM!”, and “POW!” appear onscreen. Holy productions, Batman – it’s so much fun!

Naturally, when I decided to crochet some DC characters, I knew that I wanted to make the Adam West-Burt Ward versions of the Dynamic Duo. Now, I’ve made superheroes before – as you’ve seen in my previous posts regarding my series of crocheted Marvel Avengers – and, as such, had most of the necessary elements already figured out: gloves, boots, belts, and especially capes. However, up until making Batman and Robin, I had not attempted to crochet masks – and while the Avengers often go around without them, the Caped Crusader and Boy Wonder do not. As such, I struck a heroic pose of justice and determination, and got to work.

For Batman’s cowl, I started out by following the first several rows of the head for my “people pattern.” Once I reached the row where I usually put in the eyes, I stopped crocheting in-the-round and instead went back-and-forth across. This way, I ended up with an opening for the face. I then single-crocheted two strips: one to go across the eyes (joined at each end and a midpoint on the cowl opening) and one for the chin. Finally, I made two small triangles for the iconic bat ears.

Robin’s mask was actually the more difficult to figure out. For some reason, applying the same principle of the single-crochet strips from Batman’s cowl did not transfer over well: instead of concealing his secret identity, it actually made the Boy Wonder look like he was wearing a very thick pair of oversized fake glasses! I tried several variations of these strips before scrapping them completely, opting for a single strand of yarn wrapped twice around his head with a small piece glued in between to separate the eyes. It looked instantly better!

Holy crochet, Batman! The Dynamic Duo are officially ready for action! 🙂

Crafts with Pizzazz: C-3PO!

Blog Pic 29

Hello from Bee!

On behalf of Boss-Bot and myself, I apologize for the very long delay between posts: work schedules shifted around quite a bit, rendering it incredibly difficult to keep up with the blog. But things are settling down, now, which means that “Nerds with Pizzazz” will be back up and running! So to our regular followers, thank you for your patience! To any new readers, welcome! We hope that you enjoy our blog filled with all things geeky!

In my last post all those months ago, I showed you the latest piece in my “Star Wars” crochet series: R2-D2. I am pleased to report that, since then, there has been one more addition to the set. While watching the Oscars, I was inspired to create a little gold statuette of my own – a protocol droid, to be exact. That’s right: tell the Ewoks to start celebrating, because C-3PO is now fully functional!

Considering the difficulty levels of some of the other pieces in my “Star Wars” series – most notably, Chewbacca – C-3PO proved to be relatively simple. I used my regular “people pattern,” minus the bobble stitch for the nose. I also used felt and some 3D paint for the face, instead of the usual yarn and embroidery thread, in order to give him his characteristic droid appearance. To finish it off, I chained some rounds of gold yarn and attached them to the arm and leg joints, as well as above the felt eyes.

Well, R2 is certainly happy to have his friend around; I hope you enjoy C-3PO, too! 🙂

Blog Pic 30

Crafts with Pizzazz: Chewbacca!

Blog Pic 27

Hello from Bee!

Happy holidays! Last week was so full of holiday activities for us that I was not able to post anything; I will make up for that now!

All right…since the last post, Boss-Bot and I have both seen “Star Wars VII: The Force Awakens,” and we really enjoyed it! That’s all I’ll say for now, though: no spoilers here!

That being said, I’ve been adding to my series of “Star Wars” crafts, moving right along with the great big fuzzball himself, our favorite Wookiee of the Year, Chewbacca!

Admittedly, this has been the most challenging figure I’ve made to date: not only were the proportions completely different from all of my previous patterns, but I also found that none of those patterns even worked as basic references. So I let out a RAAAAWWWGH and started from scratch.

I began with a single-colored cylinder for the head/body, but once I started my first attempt at the arms and legs, I quickly realized that it didn’t look right proportionally. I unraveled it and tried again, this time defining the head and body with a few rounds of decreases, as well as adding a second shade of brown to the body.

This looked much better, so I was able to turn my attention back to the legs, which were now too thin for the new body. I tried again, increasing by about four stitches – which proved too thick, so I remade them with only a two-stitch increase. That worked well, and it turned out that the very first leg pattern I had tried actually served well for the arms: all I had to do was adjust the length and light brown-brown proportions.

After that, it just came down to the finishing touches. I crocheted an adjustable ring for his snout and glued on a felt nose and mouth. I also made a thin, flat piece of darker brown crochet with gray felt pieces for his studded belt.

And here he is with all of his Rebel friends! 🙂

Crafts with Pizzazz: Luke Skywalker and Yoda!

Blog Pic 25

Hello from Bee!

A long time ago, in a galaxy far, far away, the first “Star Wars”-themed post appeared on our blog.

Okay, so it was last week. 🙂

The point is, “Star Wars VII: The Force Awakens” opens this Thursday, and Boss-Bot and I are more excited than Stormtroopers who went to a Samsung store and found the Droids they were looking for.

In honor of our love for “Star Wars,” I’ve been doing a lot of craft projects worthy of the Rebel Alliance. Last week, I showed you Han Solo and Princess Leia. This week, I would like to present a pair of famous Jedis: Luke Skywalker and Yoda!

With my “people pattern,” Luke was easy to crochet. For his longer Tatooine shirt, I just added a few extra rows in the same way that I made Mary Poppins’s skirt and Leia’s dress. I also chained a piece of brown yarn for a belt.

When I started Yoda, I knew that I wanted to make him as close to scale as possible to the other figures – which, for Yoda, was a little less than half the size (“Judge me by my size, do you? Hmm!…”). I ended up scaling down the basic proportions from my pattern, taking out a few rows here and there to create a rounder head and shorter legs. I also added two triangular pieces of flat crochet for his ears, and a triple knot of yarn for a more defined nose. His beige robe was created by crocheting a flat piece of half-double crochet that, halfway through, I split into two sections, essentially creating a big letter Y. The two top parts of the Y drape over Yoda’s shoulders and attach to the sides of the lower part.

Look fantastic, they do! 🙂

Crafts with Pizzazz: Han Solo and Princess Leia!

Blog Pic 24

Hello from Bee!

Well, it’s December, which means snow, holidays, and of course, the new “Star Wars” movie! “Star Wars VII: The Force Awakens” premieres next week; with presale tickets numbering in the millions, resulting in so many theaters already sold out opening night/day (like all of the ones near Boss-Bot and me), it is clear that this is going to be the movie of the season.

Boss-Bot and I are certainly excited about it! We’ve been getting our Force on with movie nights, exchanging “Star Wars” gifts, and (for me) making “Star Wars”-inspired crafts that I will be sharing with you over the next few weeks.

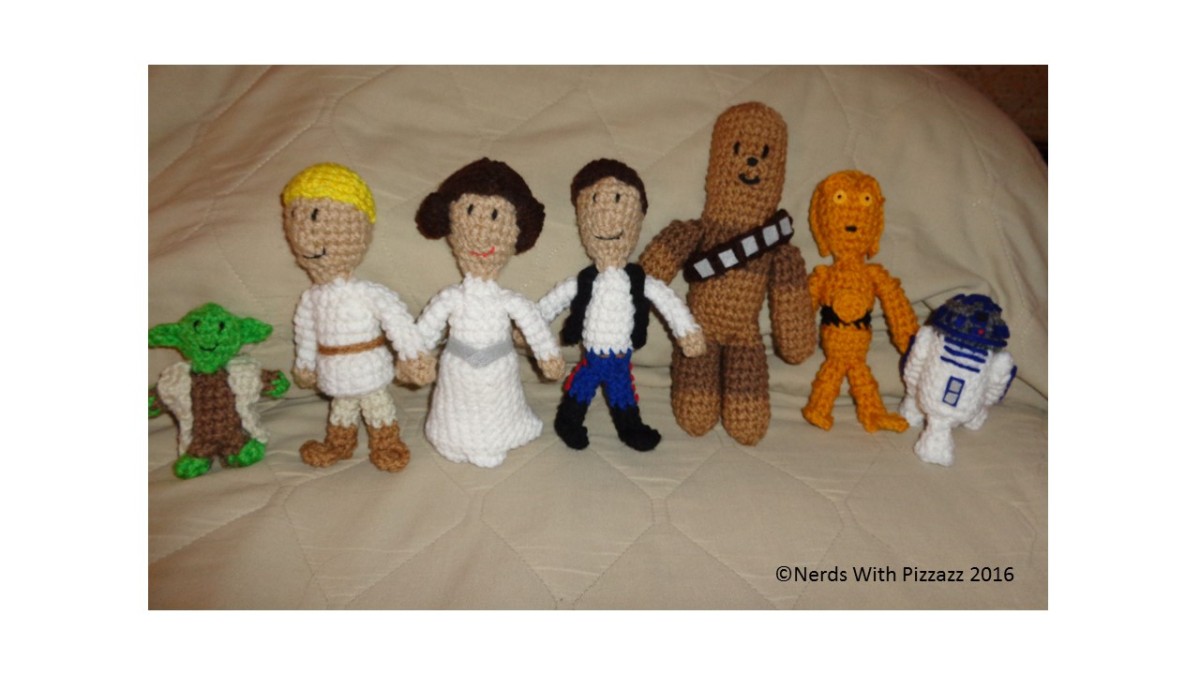
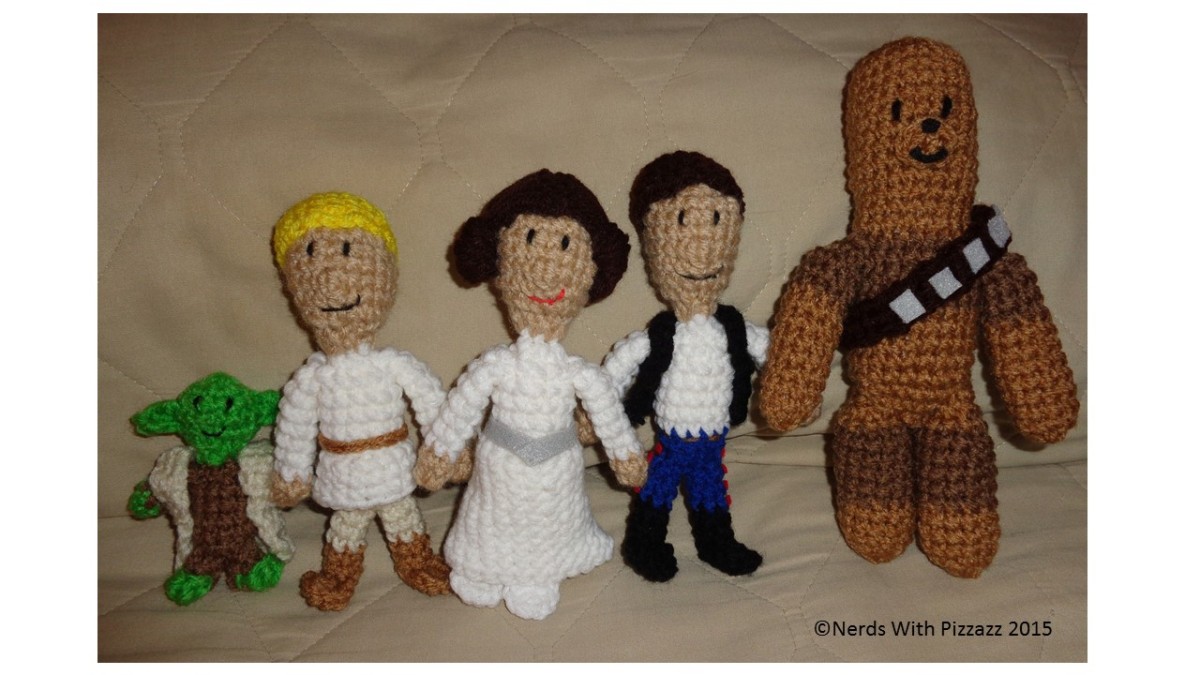
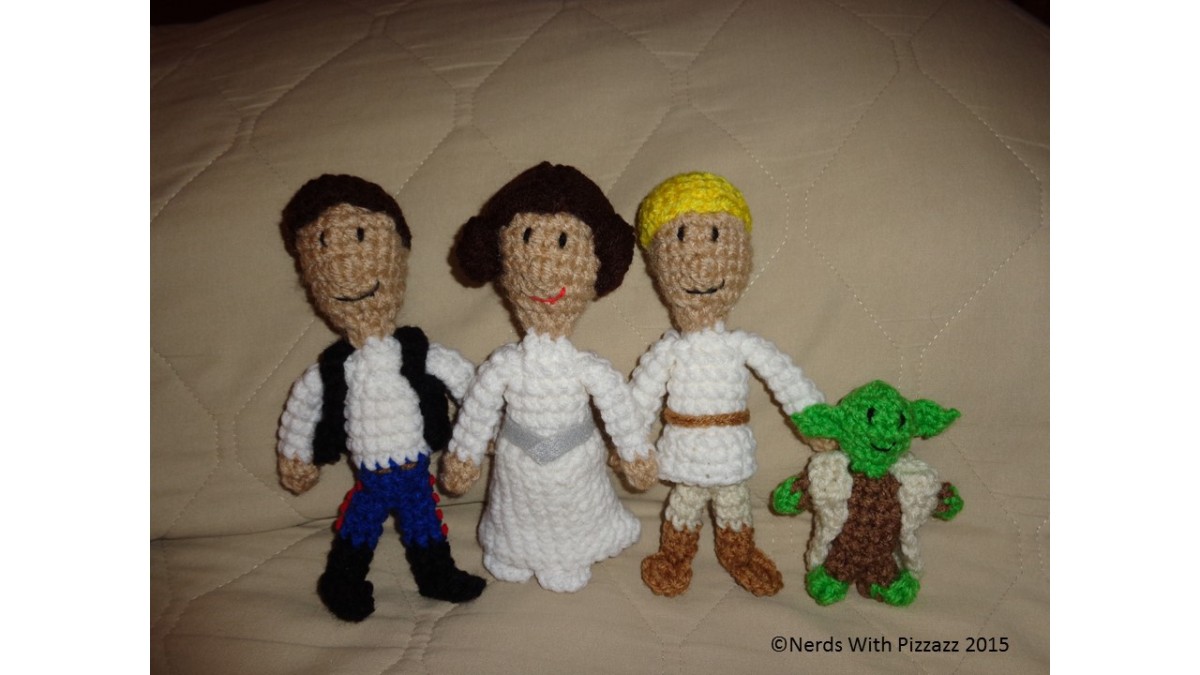
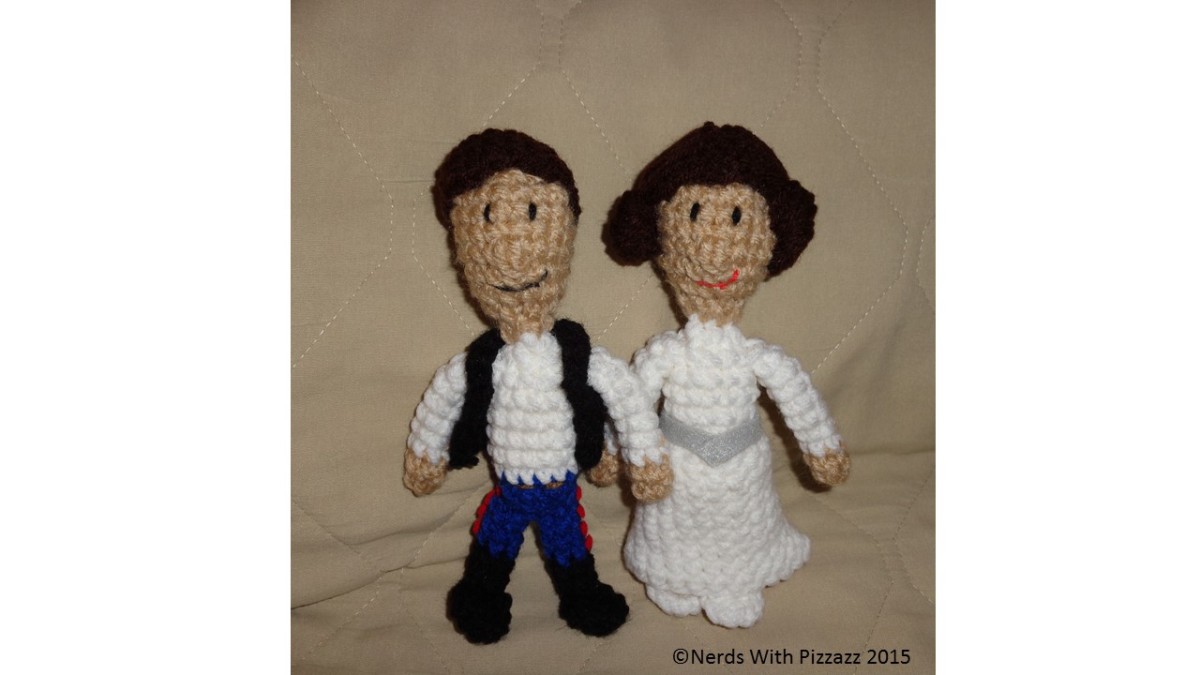
I would like to start with two of my absolute favorite “Star Wars” characters: the rebel princess and her scruffy-looking Nerf-herder, the “I love you” to each other’s “I know,” Princess Leia and Han Solo!

I love Harrison Ford and Carrie Fisher. In fact, a long time ago (in a galaxy far, far away), I actually used Allison Hoffman’s AmiguruME book to make my first Han and Leia, which came out looking great. After developing my own “people pattern,” however, I decided to challenge myself and use it to make the couple again.

Crocheting Han was fairly easy. The only extras I had to incorporate into the basic pattern were a belt, felt pieces for the red stripes on his pants, and a black vest. With regard to the vest, I thought about making it exactly like the Mary Poppins coat without the sleeves, but then decided to try something different. I ended up single-crocheting a flat piece with black yarn. Two rows from the top, I skipped the single crochet for the first and last stitches and chained some extra stitches instead. When I rejoined the chains to the piece, it created two spaces on either side for armholes. After that, I simply single-crocheted one more row on top to finish it off.

With Leia, I made her dress the same way I made Mary Poppins’s skirt, adding some extra rows towards the bottom for a longer skirt and a strip of grey felt for her belt. The real challenge actually came with creating her signature “A New Hope” hairstyle. After slip-knotting all of the long pieces of brown yarn into the crocheted brown top, I tried several different ways to style the yarn into her side buns. I used twists, loops, knots, braids, hair ties, you name it – but none of those looked good or even stayed in place. (I can only imagine how much effort was put into the real hair and makeup for Carrie Fisher for that first movie!)

Fortunately, I had an idea. I used the “magic loop” technique and created two chained circles – exactly the same way I create shoes for my “people pattern.” I sewed these circles onto each side of Leia’s head, then used my embroidery needle to wrap each slip-knotted piece of yarn around and through them. The buns looked fantastic, but I ended up with a bunch of excess yarn tails in the back. Rather than cutting them and running the chance of the buns falling apart, I simply sewed over the tails with another piece of brown yarn; this technique both secured the buns and created a fuller look to the hairstyle at the back.

Are you looking forward to the new movie? Who are your favorite “Star Wars” characters? Leave a comment below! 🙂